Cinco de Mayo is around the corner and Pinterest is exploding with colorful piñatas and cactus themed DIYs. I’m not going to lie…I kind of love Cinco De Mayo. It gives me a valid excuse to overindulge in a large plate of nachos and not feel guilty about it afterwards. I was, after all, celebrating Mexican heritage right?

Anyway, after my nachos, I usually like to round out my meal with a little something sweet. Last year I made some Margarita Macarons which went over very well. But this year, I decided to take some inspiration from Pinterest and make a piñata themed cake.
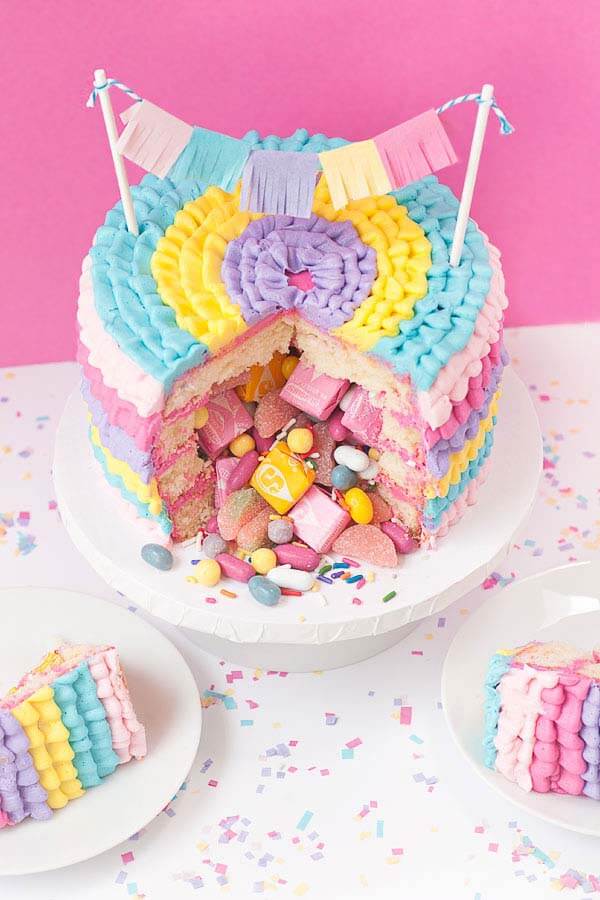
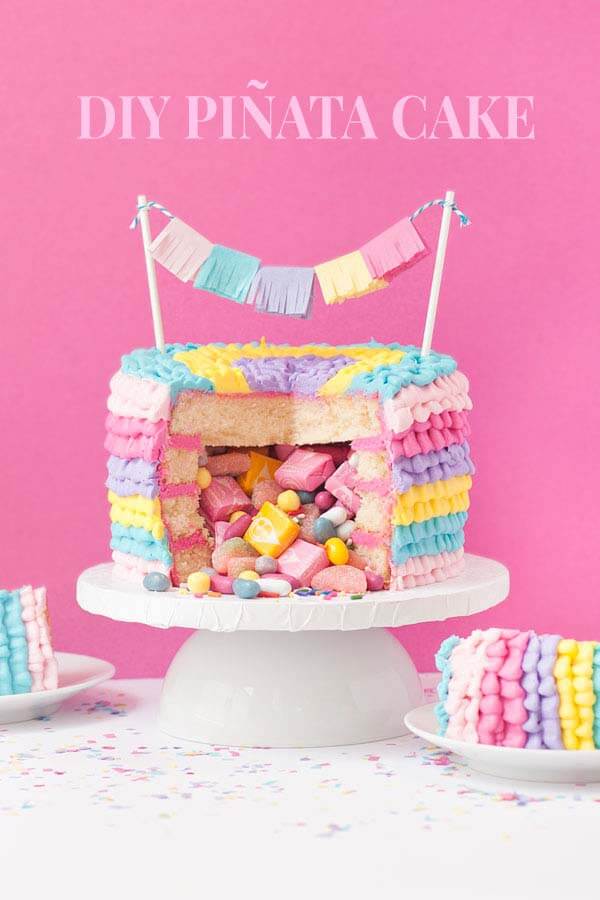
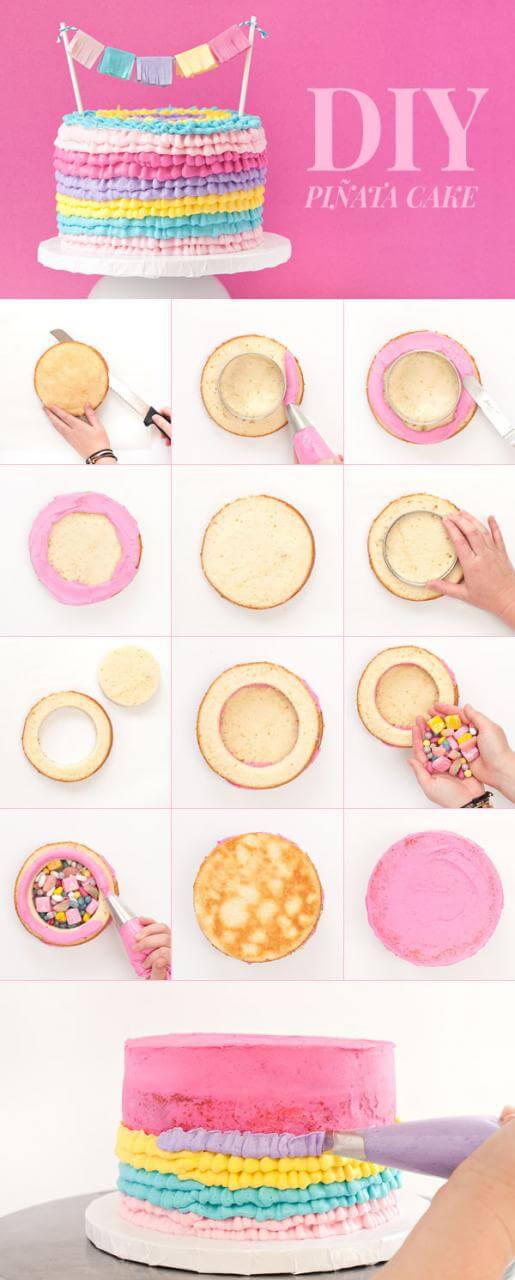
I know it looks a little intimidating at first, but it’s really not that difficult to do. To prove it to you, I made a step by step tutorial so you guys can see exactly how I did it. It’s the perfect way to end your Cinco de Mayo celebrations!
DIY PIÑATA CAKE
Ingredients
MATERIALS
- Four 6" cake pans
- 4 - 4/5" circle cookie cutter
- Piping Bags
- Large Round Piping Tip and Ribbon Piping Tip
- Kitchen Scale
- Assortment of candy for the middle
- DIY cake topper
VANILLA CAKE
- 3/4 cup unsalted butter
- 1/4 Cup vegetable oil
- 1 3/4 cup sugar
- 3 eggs
- 1 tablespoon vanilla
- 1 1/4 cups cake flour
- 1 1/4 cups all purpose flour
- 3/4 teaspoon salt
- 2 teaspoon baking powder
- 1 cup buttermilk
BUTTERCREAM
- 1 1/2 cups unsalted butter, room temperature
- 6 cups powdered sugar
- 2 teaspoons vanilla extract
- 1/4 teaspoon salt
- 1/4 cup milk
- Assortment of food coloring
Instructions
FOR THE CAKE:
- Preheat the oven to 350 degrees and prepare four 6" pans with non-stick spray and parchment rounds.
- In a stand mixer fitted with a paddle attachment, combine butter, sugar and oil on a low speed until just combined. About 1 minute.
- Add eggs and vanilla on medium/low speed. Mix until combined.
- Add flours, salt and baking powder. Mix on a low speed until just combined. Do not over mix.
- Slowly stream in buttermilk. Mix until combined.
- Divide batter evenly between four pans. Bake for 25-30 minutes.
- Set pans on a cooling rack to cool.
FOR THE BUTTERCREAM:
- In a stand mixer using a whisk attachment, beat butter until smooth.
- Add powdered sugar, vanilla, milk and salt. Mix until light and fluffy.
- Using a kitchen scale and a spoon, scoop out 120g of frosting into a small bowl. Repeat this three more times. There should be a good amount left over (this will be the color you use for the filling + crumb coat). Color each bowl of frosting with a desired color.
ASSEMBLY
- Remove cakes from the pans. Use a serrated knife to cut the tops off each layer of cake.
- Put the first layer down on a cake plate. Place a 4" cookie cutter in the middle and spread frosting around the outside.
- Using the 4" cookie cutter, create a hole in the middle of the next layer. Place it on top of the first layer and add another layer of frosting.
- Repeat with the third layer.
- Add assorted candy into the hole. Make sure you fill it all the way up to the top.
- Frost the top portion of the cake and add the final layer (bottom side up).
- Give the entire cake a nice crumb coat and set it in the fridge for at least 30 minutes.
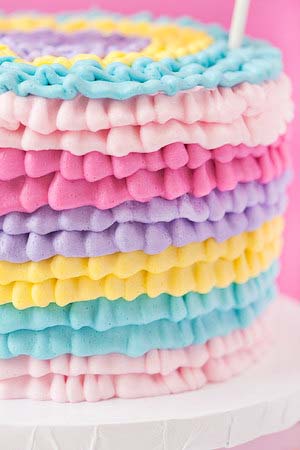
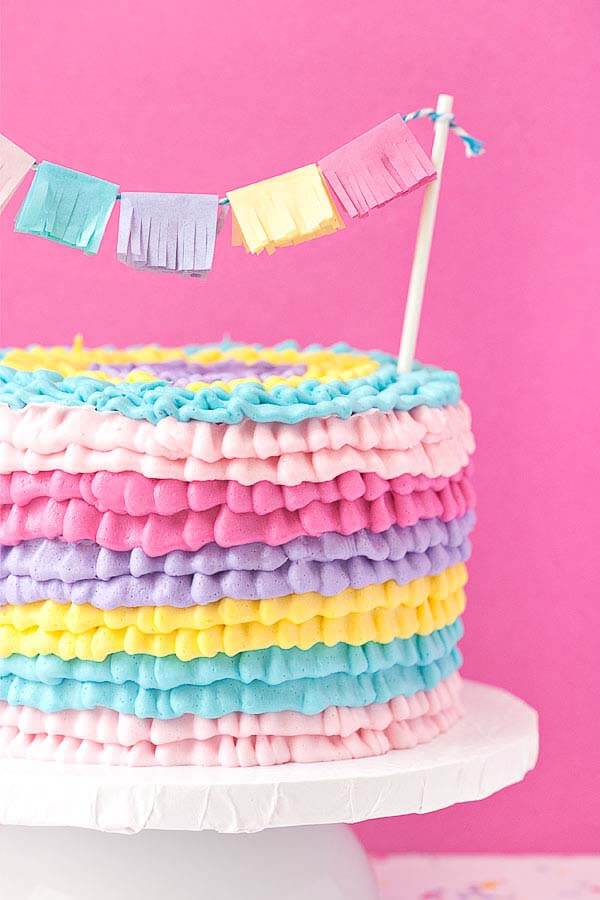
- Once the cake is cooled, prepare a piping bag with a colorful frosting and a ribbon tip.
- With the larger side of the ribbon tip facing down, pipe all the way around the cake. Once you have gone all the way around, start 1/4" above the first later and do a second layer.
- Alternate colors until you reach the top.
- With the larger side facing out, pipe around the top of the cake.
- Alternate colors until you reach the center.
- Add a DIY cake topper.


